 |
||||||||||||||||||||||||||||||||||||||||||||||||||||||||||||||||||||||||||||||||||||||||||||
|
Electronics / Computers
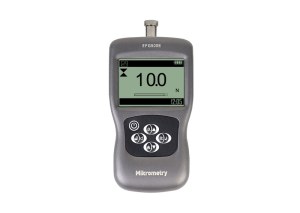
Digital Push Pull Force Gauge EFGE |
||||||||||||||||||||||||||||||||||||||||||||||||||||||||||||||||||||||||||||||||||||||||||||
|
Accuracy |
± 0.3% F.S. |
|
Selectable Units |
N、gf、 kgf、 of and bf |
|
Display |
160*128 dot matrix LCD(2.8 inches) with LED Backlight |
|
Overload Capacity |
150% of F.S. (LCD blinks beyond 110%) |
|
Overload Protection |
Overload Protection Mechanism to prevent to be damaged |
|
Measurement Mode |
Track 、Peak、Preset Peak |
|
Data Sampling Rate |
1KHz |
|
Display Update Rate |
10 times/second |
|
Memory |
500 data |
|
SetPoint |
Programmable high and low limits |
|
Battery Indicator |
The display flashes the battery icon when the battery is low |
|
Power |
3.6VDC 400mAH Ni-Mh rechargeable batteries |
|
Battery Life |
Approx. 7 hours per charge |
|
Charger / Adaptor |
Universal USB/BM charger, Input: 110~240VAC |
|
Temperature Effects |
<0.03% FS per °C</span> |
|
Communication |
USB or RS-232 |
|
Software |
Free software for USB communication |
|
Outputs |
RS-232, "Within" set point output, "Under or over" set point output |
|
Operating environment |
Temperature: -10 to 40°C |
|
Relative Humidity: 20 to 80% |
|
|
Storage environment |
Temperature: -20 to +50°C |
|
Relative Humidity: 5 to 90% |
|
|
Dimensions |
150*72*33mm |
|
Weight: |
0.45 kg (1 lb) |
|
Accessories |
AC adapter/charger,6 attachments: hook, flat tip, conical tip, chisel tip, notched tip, extension shaft |
|
Options |
Mini-printer, Measuring Adapter, EST-FG1M1 Test Stand, EST-FG2V Motorised Test Stand, EST-FG2H Motorised Test Stand, Ergonomics measuring Kit. |
|
Models |
Capacity/Resolution |
||||
|
N |
kgf |
lbf |
Ozf |
gf |
|
|
EFG10E |
10/0.01 |
1/0.001 |
2.2/0.001 |
35/0.01 |
1000/1 |
|
EFG50E |
50/0.01 |
5/0.001 |
11/0.01 |
180/0.1 |
Jan-00 |
|
EFG100E |
100/0.1 |
10/0.01 |
22/0.01 |
350/0.1 |
- |
|
EFG500E |
500/0.1 |
50/0.01 |
110/0.1 |
1800/1 |
- |
|
EFG1000E |
1000/1 |
100/0.01 |
220/0.1 |
Jan-00 |
- |
How to Use Push-Pull gauge?
Choose model
This pull-push meter series has a variety of models can be selected. Different models corresponde to different range and resolution. Select the appropriate model based on practical needs before use. DO NOT exceed the capacity of the gauge, or it may damage the force gauge forever.
Choose measuring heads
In order to complete the test work conveniently, this pull force meter is equipped with a variety of measuring heads(adapters). Select the appropriate measuring heads according to the actual need.
Power on/off
Touch the power switch for 2 seconds to power it on or off.
After switching the instrument on, you should check the model and the battery Icon. If the power is low, the push-pull meter should be recharged.
Testing
After completion of the test preparation, testing can be done.
- Measuring heads
Select the appropriate measuring head, install it on the gauge's measurement axis. Tighten it by hand, without the use of tools. Do not use a deformed or damaged measuring head.
NOTE: Do not use tools to vigorously tighten the measuring head, otherwise it will damage the force gauge.
- Units
The digital push-pull force gauge has a variety of measurement units, select the appropriate unit of force. Under the measured interface, press the Menu key to enter the menu interface.
- Test Mode
This push-pull force gauge series has 3 kinds of measurement test modes can choose from. You can select a Measure Mode by touching the measuring interface, or changing it in the menus.
Track: The real-time measuring mode, under this mode, press the zero key the force gauge will be cleared (remove tare).
Peak: Peak readings will not change until a higher value is measured. Under this mode, touch the zero key the force gauge will update the display immediately.
Auto-Peak: In this mode, the digital push-pull gauge displays a peak value of force in a fixed duration. The duration time can be set in menus.
- Tolerance Limit
The tolerance limits can be set for GO/NG measurement also. See for detail. If you set the alarm on and a valid limit, The icon will be displayed for within limit, lower than lower limit, or exceeding the upper limit.
- Zeroing
Touch the zero key to clear the pull force meter in track mode for removing the tare.
Hand-held or Mounting
The digital push-pull gauge is a portable Instrument. You can do the testing hand-held, or you also can install the force gauge on the test stand so as to obtain accurate measurement results. There are 6 M4.0 mounting screw holes on the back, which can be fixed on the test stand.
NOTE: The depth of the mounting hole is 8.0mm, please choose the appropriate screws, screw into the depth of the force gauge shall not be greater than 7mm.
Storage
Measured results can be stored in the push-pull gauge digital so that you can review or print them later. Under the measured interface, touch to save value measured, and the save icon will be displayed.
Browse and Printing
The values saved in memory can be reviewed in the Browse function. The data in memory can be printed into a report.
Push-Pull Gauge Calibration Procedure
Because of the sensor material performance or the influence of external factors, there may be errors in a certain range after a period of time use. As one of the leading measuring instruments manufacturers in China, Mikrometry suggests you should send the digital push-pull gauge to a specialized testing organization for calibration.
Whereas, if you have some standard force weights or the other standard load and some test stand, you may calibrate the push meter also.
Mount the push-pull meter.
Remove the tare by use of the zero key.
Enter the Calibration interface, Show the following.
Load a standard force. Now the value in the standard input area is just equal to the current measured value. Wait a moment for the force stability.
Touch the zero key and peak key to input the standard force value.
Touch to enter the next calibration. Touch can interrupt the calibration. When the 5 times calibration had been finished or interrupted, a confirm window will pop up to ask for save or not save the calibration.
Touch the zero key or peak key to select, then press the menu key.
If "YES" is selected, "Calibrate complete!" is displayed.
NOTE:
① Set the unit of the force to the unit used in calibration previously.
② Ensure that the tare weight of the attachment has been removed before calibration.
③ You can do any point or points calibration from 1 to 5 point. We recommend 5 points calibration.
Contact : metry mikro, 0755 29888771
Good deal: buying from seller
We invite you to read our terms of use. You can also visit our FAQ section and see our information section on the risks associated with counterfeiting.
|
This page is about importers and exporters of Digital Push Pull Force Gauge EFGE Search in a category : Electronics / Computers Search in a category : efge, push, gauge, digital, pull, force |
Saturday, April 18, 2015
Quantity : 100000 - Price : 200 per pallet
With so many of today's products (whose performance is little more than a claim based on hype) leaving consumers feeling cheated, it is the symbol of the horse has represented power and strength the world over for centrauries and provides the foundation uon which our brand is built...
Beverages Supplies Inc
- 00237 - Limbe
- +237661757711
Friday, March 04, 2016
Quantity : 400 - Price : 320,00 €
Now starting Xbox One brings together the best exclusive games, the most advanced multiplayer, and entertainment experiences you wont find anywhere else. Play games like Titanfall and Halo together with your friends on a network powered by over 300,000 servers for maximum performance...
Electronics Design Services
- CM23 2JP - Hertfordshire
- +447405858765
Thursday, August 18, 2016
Quantity : 5000-1500 - Price : 1200$/tns
I name myself GBEDODJICHE DIDIER owner of Inter-African company AGRO-WORLD-IMPORT-EXPORT-TRADE Producer, Supplier, Import-export of theagricultural produce. such-that: walnut of cajou, wood, cotton, it rice, corn, vegetable bean, oil, pepper, tomato,fruits, vegetable, produced raw materials...
AGRO-WORLD-IMPORT-EXPORT-TRADE
- 00229 - Cotonou
- +22 9 98 73 74 35


